Like us on Facebook
Total Pageviews
Popular Posts
-
You may don't know that 77% of consumers prefer to receive permission-based marketing communications through email (stats from ExactTarg...
-
Understanding the basics of Linux security is the best method to keep your business from outside or inside attacks.
-
There are many errors that will happen when you design a website then bring it live. The error that I got today is "Can't find the ...
-
1- Winetricks is a application which hel p to ins tall library or part for Wine. The process to inst all is quite simple :
-
I write this post because I want to show you how to backup your Gmail emails to your computer. It can also help to transfer all of Gmail em...
My Blog List
Blog Archive
-
▼
2011
(81)
-
▼
July
(31)
- Setting Up Squid Proxy Server On Linux (CentOS/RHEL)
- How To Setup A Secure Apache Web Server On Linux
- Setting Up VNC Server On Linux (RHEL/CentOS)
- How To Secure SSH Connection
- Backup and Restore Linux OS
- Working With Security Enhanced Linux (SELinux)
- Managing Password Policies On Linux
- Configure NAT Server On Linux (CentOS/RHEL)
- Basic Linux System Security
- Auto Install Linux Over Network
- How To Upgrade The Linux Kernel
- Monitor System Performance In Linux
- Configure Windows And Linux Central Authentication...
- Centralized Log Management In Linux (RHEL)
- Linux File & Folder Permission With Group Collabor...
- User And Group Management In Linux
- How To Install TeamViewer On Ubuntu
- Creating Your Own Repository From CentOS DVD
- How To Create Your Own RPM Package
- Working With RPM In Linux
- Troubleshooting Network Connections In Linux
- How To Set Up AutoMounter (AutoFS) In Linux
- Quotas Management In Linux
- Permissions Management With Access Control Lists (...
- How To Secure Your Linux Hard Disk Partition With ...
- How To Convert CHM To PDF In Linux
- Working With File System (Ext2, Ext3 & Ext4) On Linux
- Hide Yourself On The Internet With “The Onion Rout...
- How To Create Swap Space / File on Linux
- Service Management on Linux (RHEL)
- Working With Runlevels on Linux
-
▼
July
(31)
Home » Linux
How To Setup A Secure Apache Web Server On Linux
Friday, July 29, 2011
Apache is a solid and stable web server that has been around for years. Apache can also be used to host multiple websites at a single time through the use of its virtual hosts feature. There is also an option to use SSL protocol, making websites safe and secure.
1. Installing and Configuring Apache Web Server
When working with Apache, you need to packages. The first is httpd, which actually installs the Apache web server. The second is the mod_ssl package, which provides secure websites.
Step 1. Install the two required packages:
# yum install -y httpd mod_ssl
Step 2. Make sure that the service is set to start when the system boots:
# chkconfig httpd on
Step 3. Configure web server:
During the installation, a directory (/var/www) is created with a set of subdirectories. There are also a few config files to look at:
/etc/httpd/conf/httpd.conf Main config file
/var/log/httpd Log file directory for web server
/usr/lib/httpd/modules Modules for Apache
Be default, the location of a website is located in the /var/www/html directory, although this can be changed by editing the DocumentRoot option as well as the Directory option. It’s very important that you should test your config files first then reload the service. I think you don’t want your client’s connections being stop by using restart command.
2. Firewall and SELinux Configuration
Step 1. for your web server to become fully functional, you need to open port 80 and 443.
# iptables -I INPUT -p tcp -m tcp --dport 80 -j ACCEPT
# iptables -I INPUT -p tcp -m tcp --dport 443 -j ACCEPT
Step 2. For RHEL5, you need to disable the SELinux service protection to be able to utilize basic web services:
# setsebool -P httpd_disable_trans=1
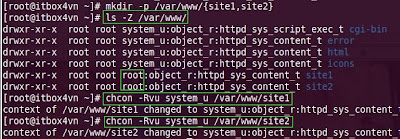
Step 3. Apache makes use of the file contexts because of the different web content available on disk. The context of any newly created directory needs to be set for the web server user to be able to access it properly.
3. Apache Security
Step 1. Limit the IP address on which the server can listen for incoming connections. Suppose you have two IP addresses: 192.168.1.1 and 192.168.1.1. Let’s configure Web server listen only form the 172.168.1.1 IP address on port 80 for incoming requests (httpd.conf).
Listen 172.168.1.1:80
Step 2. Restrict the networks, IP addresses, or domains that have access to the web server. In the <Directory> section, let’s set up Allow from and Deny from options.
<Directory “/var/www/html”> Options Indexes FollowSymLinks AllowOverride None Order allow, deny Allow from all Deny from 192.168.1 </Directory> |
Step 3. Allow only certain users to access the web server or portions of the web server. Here are the options that can be used to used based security:
AuthType Defines the authencation type
AuthName Adds comment for the user to see on login
AuthUserFile Specifies the file used to define username and password
AuthGroupFile Is similar to the user file but for groups
Require Specifies the users or groups that can login
Let’s look at an example to make the usage of these options more clear:
<Directory “/var/www/html”> AuthType Basic AuthName “Password Restricted Area” AuthUserFile /etc/httpd/userfile Require user user01 </Directory> |
You can use the htpasswd command to create the user and group accounts. Remember not to user -c option again when create another user.
Step 4. Allow only certain groups to access the portions of the web server. Here are the options that can be used to used based security:
First, open your main config file and change your <Directory> section:
<Directory “/var/www/html”> AllowOverride authconfig </Directory> |
This is allowed on a per-directory basis because you are allowing this file to “override” the default access of anyone. The create the following file (.htaccess):
The last step you need to do is add a few user accounts.
htpasswd -m /etc/httpd/userfile hr01 htpasswd -m /etc/httpd/userfile hr02 echo "hr_users: hr01 hr02" > /etc/httpd/groupfile service httpd reload |
Now if you try to access http://172.168.1.1 and http://172.168.1.1/hr, you need to type the different username and password to get inside.
4. Virtual Host
One of the big benefits of Apache is that you can run multiple websites on a single host. This is done though a virtual host configuration, where you can define different sites in your main Apache config file. Setting up virtual hosts is easy; just do the following (httpd.conf):
5. CGI Application
Let’s deploy a CGI application on the web server. Add the following section to your /etc/httpd/conf/httpd.conf file:
ScriptAlias /webapp "/var/www/cgi_app" <Directory "/var/www/cgi-app/"> Options ExecCGI FollowSymLinks Order allow,deny Allow from all </Directory> |
Then we create a directory to hold your web application:
Now if you navigate to http://172.168.1.1/webapp/test.py, you should see the CGI application be executed in the browser! There are many other types of applications that you can run, such as PHP, RUBY, and JAVA.
6. Troubleshooting Apache
There are two basic files you can use to troubleshoot with:
/var/log/httpd/access_log Logs all access to the server
/var/log/httpd/error_log Logs error messages from the server
/var/log/httpd/ssl_request_log Logs requests made to the server from clients
One common error that everyone seems to get when starting the service is about the ServerName option not being set, so the web server assumes 127.0.0.1 by default.
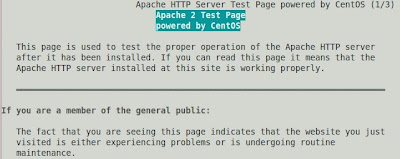
Another useful tool to troubleshoot web server issues with is the elinks browser.
# elinks http(s)://192.168.1.2
Have fun!


